
Concrete resurfacing is the process of applying a thin layer of polymer-modified cementitious material over an existing, sound concrete slab to restore a smooth, uniform surface that hides cracks, stains, spalling, and wear. Instead of demolishing and pouring a new slab — which can cost thousands — you can resurface a driveway, patio, walkway, or pool deck yourself in a weekend with a resurfacer kit, a trowel or squeegee, and careful prep. Done right, a resurfaced concrete surface looks brand new and adds 8-10 years of usable life.
Concrete is durable, but years of freeze-thaw cycles, salt, oil drips, and UV exposure take a toll. Spalling (flaking of the surface), hairline cracks, and discoloration make even structurally sound concrete look terrible. Tearing out and re-pouring a 500 sq ft driveway can cost $3,000-$5,000 and leave you with no parking for a week.

Why Resurface Instead of Replace?
Resurfacing gives you:
- A fresh, uniform surface — covers stains, minor cracks, and spalling.
- Cost savings — roughly 1/3 to 1/2 the cost of replacement.
- Speed — walkable in 24 hours, drivable in 3-7 days.
- Design options — add color, stain, or stamped texture for a custom look.
The catch: resurfacer is a coating, not a structural fix. If your slab is heaving, has wide cracks (over 1/4 inch), or is crumbling at depth, resurfacing won’t last — replacement is the answer.
Materials & Tools Needed
- Concrete resurfacer kit — Polymer-modified resurfacing cement (e.g., Quikrete Concrete Resurfacer, Sakrete). Calculate coverage from your square footage.
- Pressure washer — At least 3,000 PSI for proper cleaning.
- Trowel — Magnesium or steel finishing trowel.
- Squeegee — Long-handle squeegee for spreading resurfacer.
- Concrete sealer — Acrylic or penetrating sealer for protection.
- Extras — stiff broom, crack repair caulk/patch, 5-gallon bucket, drill with mixing paddle, duct tape, plastic sheeting, gloves, safety glasses.
Resurfacer vs. Self-Leveling Compound vs. Overlay
It’s easy to confuse the products. Here’s how they differ:
- Concrete resurfacer — Thin (1/16 to 1/4 inch), polymer-modified, bonds to sound concrete. DIY-friendly. Use for exterior slabs.
- Self-leveling compound — Flows flat, used indoors for floors under tile/wood. Not for outdoor driveways.
- Stamped concrete overlay — Thicker (1/4 to 3/4 inch), can be stamped and colored. Higher skill level.
- Micro-topping / skim coat — Very thin (1/16 inch or less), decorative, hides minor imperfections only.
For most homeowners, a standard resurfacer kit is the right product.
Step 1: Evaluate the Concrete
Resurfacing only works on structurally sound concrete. Before buying anything, assess:
- Cracks — Hairline cracks up to 1/4 inch can be filled with crack repair, then resurfaced. Cracks over 1/4 inch, especially those that are moving (one side higher than the other), indicate subgrade problems and will telegraph back through any resurfacer.
- Spalling — Surface flaking is perfect for resurfacing, as long as the concrete beneath is solid (not crumbly).
- Oil stains — Must be fully removed or resurfacer won’t bond.
- Heaving/settling — Slabs that have shifted vertically cannot be fixed with a resurfacer. Replace or mud-jack first.
- Previous coatings — Paint, epoxy, or old sealer must be fully removed — resurfacer bonds to bare concrete, not coatings.
The scratch test: drag a screwdriver across the surface. If it gouges easily and leaves powder, the concrete is too soft to resurface. If it leaves a faint line, you’re good.

Step 2: Clean and Pressure Wash
Surface prep is 80% of a successful resurfacing job. Skip it and the resurfacer will peel.
Remove Oil and Stains
- Apply a degreaser to oil spots and scrub with a stiff brush.
- For stubborn stains, use a poultice of kitty litter and solvent, or a dedicated concrete cleaner.
- Rinse thoroughly.
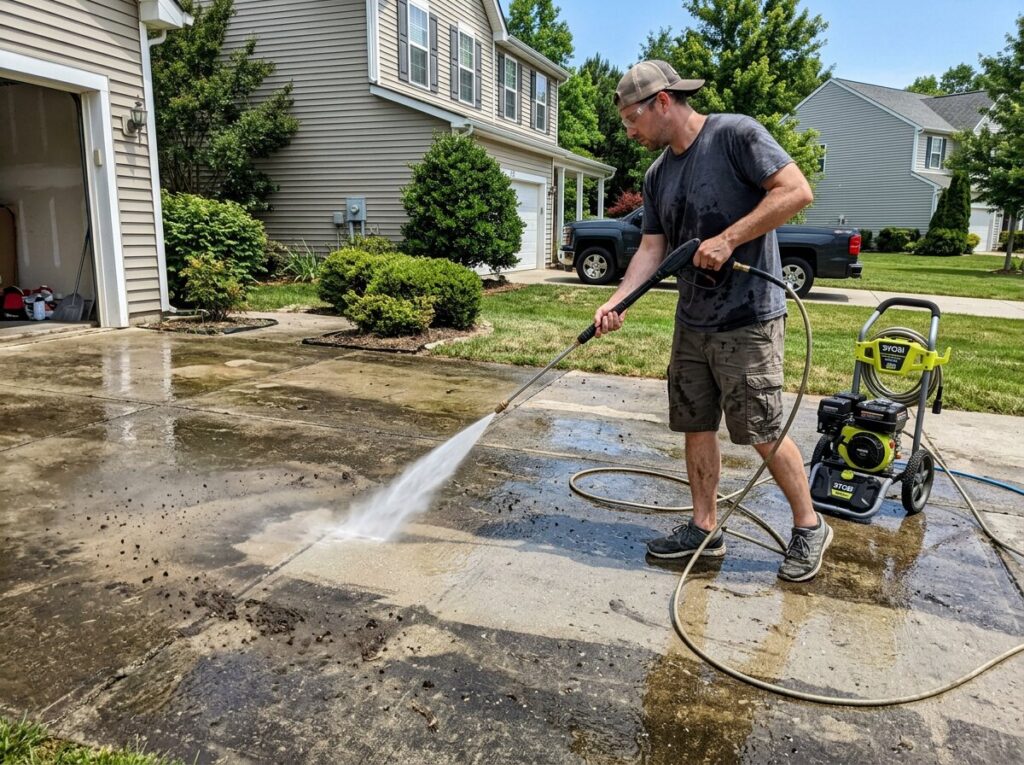
Pressure Wash the Entire Surface
- Use a pressure washer at 2,500-3,500 PSI with a 25° or 40° nozzle.
- Hold the wand 8-12 inches from the surface and work in overlapping sweeps.
- Blast out all dirt, algae, loose material, and debris from cracks and joints.
- The surface should look clean and slightly roughened (a profile) so the resurfacer has something to bond to.
- If your pressure washer alone doesn’t expose clean aggregate, etch with a muriatic acid solution (follow safety instructions) or use a mechanical grinder for stubborn areas.
Fill Cracks and Repair Spalls
- After the surface dries completely, fill hairline and small cracks with a concrete crack repair compound — a polymer caulk or pourable patch rated for exterior use.
- Overfill slightly and trowel flush.
- For larger spalled areas deeper than 1/4 inch, use a concrete patch (polymer-modified) and trowel smooth, feathering the edges into the surrounding concrete.
- Let all repairs cure per manufacturer instructions — usually 4-24 hours before resurfacing.
Mask Off the Area
- Tape plastic sheeting over expansion joints, adjacent walls, landscaping, and anything you don’t want coated.
- Insert foam backer rod into control joints to keep resurfacer out — otherwise it’ll crack along the joint line.
Step 3: Mix the Resurfacer
- Read the kit instructions exactly — water ratio is critical. Too much water weakens the resurfacer; too little makes it unworkable.
- Pour the correct amount of clean, cool water into a 5-gallon bucket, then gradually add the resurfacer powder.
- Mix with a drill and paddle attachment until you reach a pourable, lump-free consistency — like thin pancake batter for a squeegee application, or thicker like peanut butter for a trowel application.
- Work in small batches — most resurfacer kits have a pot life of 20-30 minutes. Mix only what you can apply in that window.
- Mind the temperature — apply between 50°F and 90°F. Avoid hot midday sun, which dries resurfacer too fast and causes cracking. Early morning or overcast days are ideal.
Step 4: Apply the Resurfacer
You have two main application methods, depending on the finish you want.
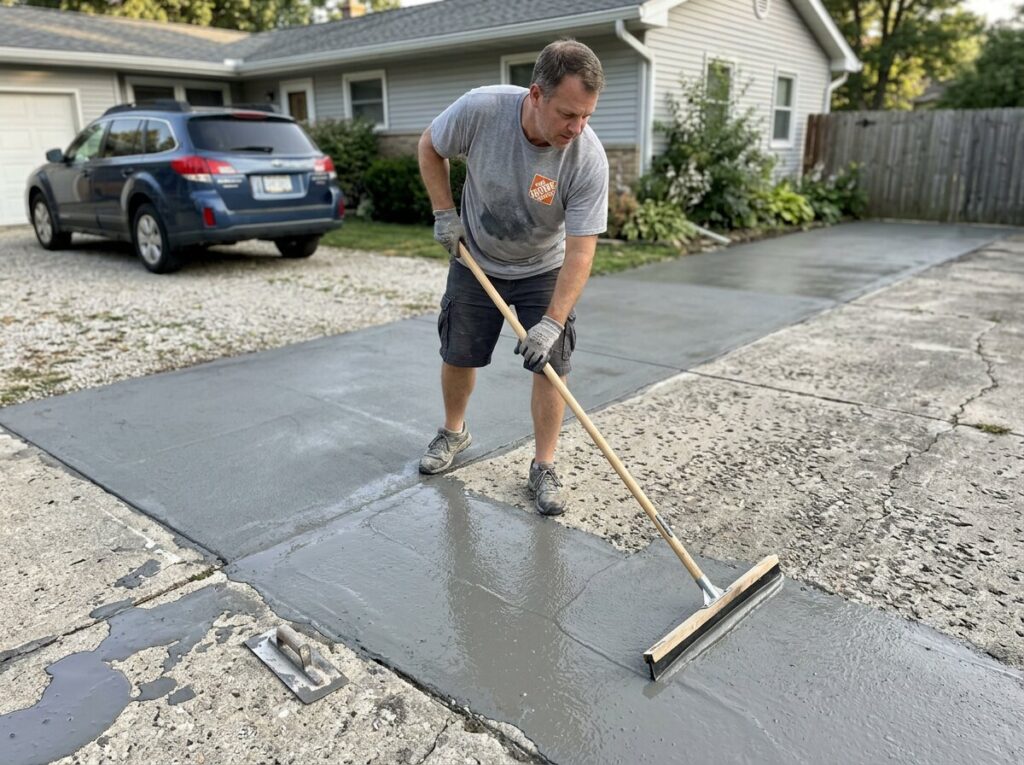
Squeegee Application (Broom Finish)
Best for driveways and walkways where slip resistance matters.
- Pour a puddle of resurfacer and spread with the long-handle squeegee, working in sections of about 50-100 sq ft at a time.
- Keep a wet edge — always blend new material into the still-wet edge of the previous section to avoid lap marks.
- Aim for a uniform 1/16 to 1/8 inch layer.
- After spreading, lightly drag a soft broom across the surface in one direction for a textured, non-slip broom finish.
- Work quickly with a helper — one pours and spreads, the other brooms.
Trowel Application (Smooth Finish)
Best for patios and decorative surfaces where you want a smooth look.
- Scoop resurfacer onto the surface with a trowel or gauge rake.
- Spread to an even 1/8 to 1/4 inch layer.
- Finish with a magnesium trowel, smoothing in wide arcs to remove trowel lines.
- For a truly smooth finish, go over it again once it begins to set but is still workable.
Trowel Technique Tips
- Hold the trowel at a slight angle (10-15°) to the surface.
- Overlap each pass by half the trowel width to avoid ridges.
- Don’t overwork the surface — too much troweling brings water to the top and weakens the surface.
- Keep tools clean — dried resurfacer on the trowel will gouge the fresh layer.
Apply a Second Coat (If Needed)
For deeper spalling or a thicker finish, apply a second coat after the first has set enough to walk on (usually 2-6 hours). Mist the first coat lightly before applying the second for better bond.
Step 5: Add Color or Stain (Optional)
Resurfacer dries to a natural light gray. For a custom look:
- Integral color — Some kits accept liquid colorant mixed in. Best for uniform, subtle color.
- Acid stain — Apply after the resurfacer fully cures (7 days). Creates mottled, variegated tones that mimic stone.
- Water-based stain — Easier and more predictable than acid; available in a wide color range.
- Dry-shake color hardener — Broadcast onto fresh resurfacer and trowel in for a rich, durable surface color (more advanced technique).
For a high-end look, consider a stamped overlay — apply a thicker overlay (1/4 inch) and press stamp mats into it before it sets to mimic stone, slate, or brick. This requires practice and rental stamps but produces stunning results.
Step 6: Curing
Proper curing is what gives resurfacer its strength and prevents cracking.
- Keep it moist — Lightly mist the surface with a fine spray 2-3 times in the first 24 hours if it’s warm or breezy. You can also cover with plastic sheeting to trap moisture.
- Foot traffic — Wait at least 6 hours or per manufacturer directions.
- Vehicle traffic — Wait 3-7 days for a driveway. Premature loading cracks the surface.
- Avoid rain — Cover if rain is forecast in the first 24 hours; a wet cure is good, a rainstorm is not.
- Full cure — Reaches full strength in 28 days, though it’s usable much sooner.
Climate Considerations
- Hot, dry climates (Southwest) — Resurfacer sets fast and cracks if it dries too quickly. Work in early morning, mist frequently, and consider a curing compound.
- Humid Southeast — Slower drying is fine; watch for sudden afternoon rain.
- Cold/freezing climates — Never apply if temperatures will drop below 50°F within 24 hours. Resurfacer needs warmth to cure — fall is ideal. Salt and de-icers should be avoided the first winter.
- Coastal — Rinse salt off regularly; salt attacks the resurfacer bond over time.

Step 7: Seal the Surface
A sealer is what protects your new surface from stains, salt, and wear. Don’t skip it.
- Wait for full cure — at least 7 days, ideally 28.
- Clean the surface completely and let it dry.
- Apply a breathable acrylic sealer (penetrating for a natural look, film-forming for a slight sheen) with a roller or sprayer.
- Apply two thin coats rather than one thick one, letting the first dry per directions.
- Re-seal every 1-3 years depending on traffic and climate.
When to Call a Pro
Resurfacing is very DIY-friendly, but a few situations warrant a professional:
- The slab has structural cracks, heaving, or severe settling — resurfacer won’t fix underlying problems.
- You want a stamped or decorative overlay — the stamping technique has a steep learning curve.
- The area is large (800+ sq ft) and must be done in one continuous pour — resurfacer sets fast and lap marks show.
- You need to match an existing stamped or colored concrete — color matching is hard.
- The slab is indoors or in a sealed space — ventilation and dust from prep are challenging.
Not feeling confident? Local partners can complete this job quickly and professionally. Find a Local Pro.
Final Thoughts
Concrete resurfacing is one of the highest-impact, lowest-cost DIY projects you can take on. For a fraction of replacement cost, you turn a stained, spalling eyesore into a smooth, clean surface that looks freshly poured. The secret is entirely in the prep: pressure wash thoroughly, fill every crack, mix the resurfacer to the right consistency, and apply with a wet edge and steady hand. Cure it properly, seal it, and your driveway or patio will look new for years. Respect the temperature window, work in small batches with a helper, and don’t rush the cure. Do that, and you’ll have a renewed concrete surface you can be proud to say you did yourself.
Leave a Reply