Paver sealing is the process of applying a protective coating to brick, concrete, or stone pavers to shield them from water, stains, weeds, joint-sand erosion, and UV fading. Sealing your pavers is one of the highest-value DIY projects you can tackle: it locks in the joint sand that holds your pavers together, deepens or preserves their color, blocks oil and organic stains, and dramatically reduces weed and ant activity in the joints. A quality sealer keeps a patio, walkway, or driveway looking new for years and makes routine cleaning far easier. This guide walks you through everything you need to know to seal pavers yourself: why it matters, how to choose between water-based and solvent-based sealers and between a wet-look and natural-matte finish, surface preparation, joint-sand replenishment, application, drying and curing, and long-term maintenance.

Why Seal Your Pavers?
Pavers and the sand between them are more vulnerable than they look. Rain, foot traffic, sun, and freeze-thaw cycles slowly break down an unsealed paver surface. Here’s what sealing prevents:
- Joint-sand erosion — Rain and wind wash out the sand between pavers, causing shifting, wobbling, and weed growth. Sealer hardens and locks the joint sand in place.
- Weeds and ants — Stabilized joints leave nowhere for weed seeds to sprout or ants to nest, drastically reducing joint maintenance.
- Stains — Sealer creates a barrier that keeps oil, grease, food, leaf tannins, and fertilizer from soaking into the porous surface.
- Color fading — UV rays bleach unsealed pavers over time. A UV-stable sealer preserves (or with a wet-look, enhances) the color.
- Efflorescence and mildew — Reducing water absorption limits the white mineral haze and organic growth common on shaded pavers.
- Freeze-thaw damage — In cold climates, water that soaks into pavers expands when frozen, causing surface flaking and cracking. Sealer repels that water.
The bottom line: A $40–100 pail of paver sealer protects a paver installation worth thousands and cuts your ongoing maintenance to a fraction. It is one of the highest-ROI DIY tasks for any hardscape.
Materials & Tools Needed
- Paver sealer — Choose based on your finish and durability needs (see the comparisons below).
- Polymeric or joint sand — To refill and level the joints before sealing.
- Pressure washer — For deep-cleaning the surface before sealing.
- Pump sprayer and/or roller — For applying the sealer evenly.
- Push broom — For sweeping sand into joints and cleaning the surface.
- Leaf blower — To clear excess sand off the paver faces before sealing.
- Degreaser and paver/efflorescence cleaner — For removing oil stains and mineral haze.
- Painter’s tape and drop cloths — To protect adjacent surfaces and landscaping from overspray.
- Safety gear — Chemical-resistant gloves, safety glasses, and a respirator (especially for solvent-based sealers).
Choosing the Right Paver Sealer
Two decisions shape your result: the sealer’s base (water-based vs solvent-based) and the finish it produces (natural-matte vs wet-look/gloss). Most quality paver sealers are film-forming acrylic or urethane-acrylic blends that also stabilize the joint sand — often sold as “joint stabilizing sealers.”
Water-Based vs Solvent-Based
Water-based sealers are low-odor, easy to clean up, and safe around plants, while solvent-based sealers penetrate deeper, produce a higher gloss, and are more durable in high-traffic areas. Use the comparison below to decide which fits your project.

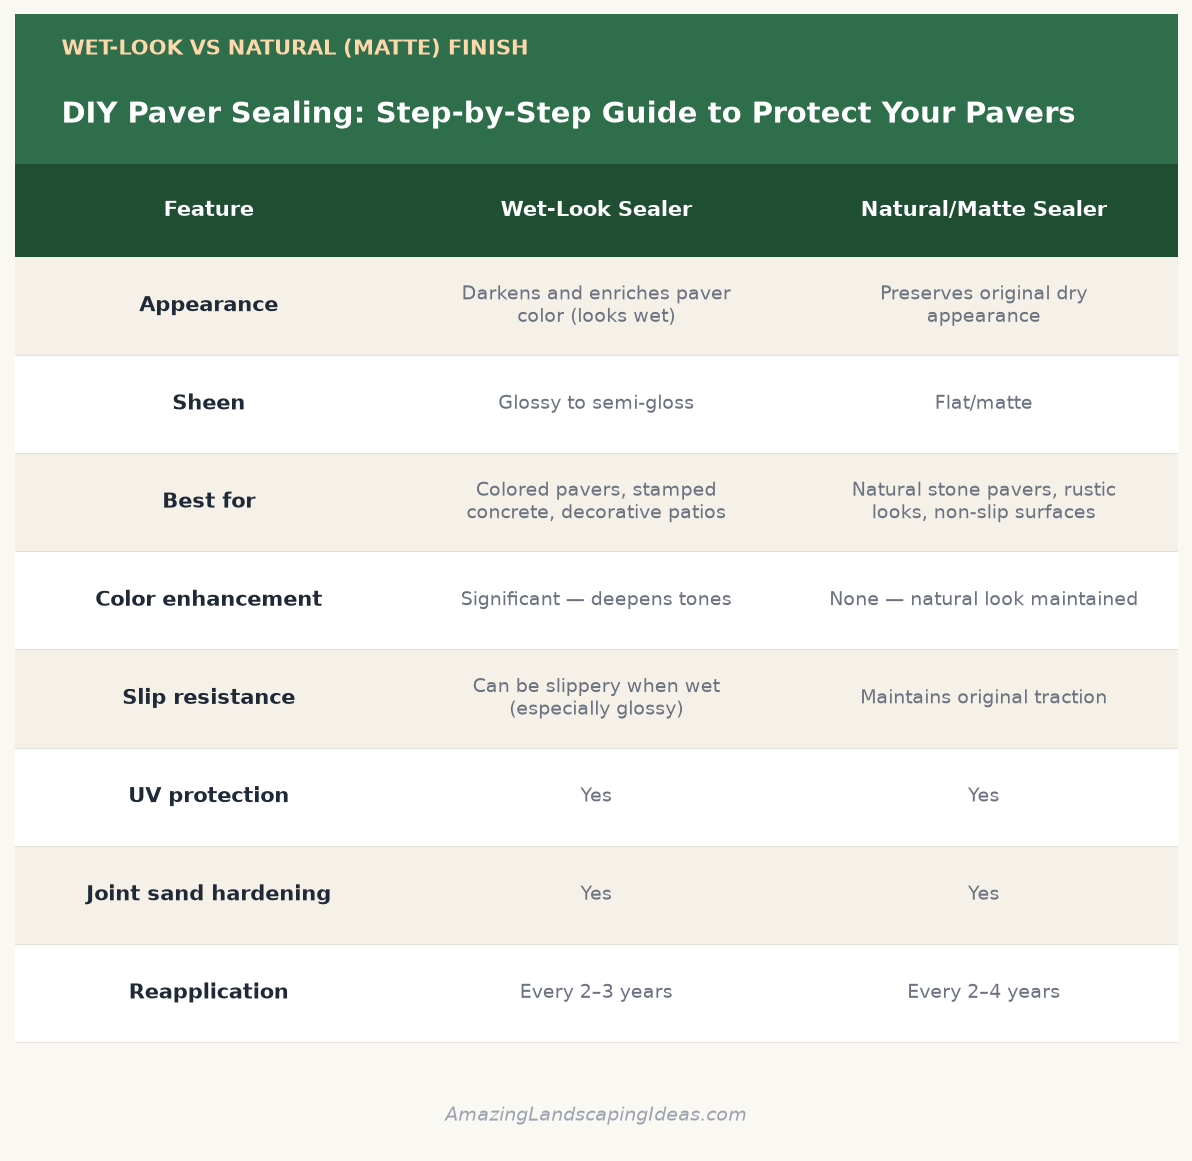
Wet-Look vs Natural-Matte Finish
The finish is a purely aesthetic choice. A wet-look (gloss) sealer darkens and enriches the paver color as if the surface were permanently wet, giving a rich, high-end appearance. A natural-matte sealer protects without changing the look, keeping the pavers close to their dry, original color. The comparison below highlights the trade-offs of each.
Step 1: Assess and Prepare the Surface
Surface preparation determines whether your sealer bonds and lasts or peels within a season. Start by assessing the pavers: if they were recently installed, wait 60–90 days before sealing so any efflorescence can work its way out and the base can settle.
- Clear the area — Remove furniture, planters, and debris, and pull any weeds growing in the joints.
- Treat stains — Apply a degreaser to oil spots and a paver/efflorescence cleaner to any white mineral haze; scrub and rinse.
- Pressure wash — Clean the entire surface with a pressure washer, working in overlapping passes. Keep the tip moving so you don’t gouge the pavers or blast out joint sand unnecessarily.
- Let it dry completely — Allow 24–48 hours of dry weather. Sealer applied to damp pavers will cloud, whiten, and peel. Longer drying is needed in humid climates.
Step 2: Replenish and Stabilize Joint Sand
One of the most important functions of a paver sealer is hardening the joint sand, so the joints must be properly filled first. Pour sand over the surface and sweep it into the joints with a push broom until each joint is filled to about 1/8 inch below the paver bevel. Use a leaf blower on a low setting or a gentle sweep to remove all loose sand from the paver faces — any sand left on top will be locked under the sealer and create a cloudy haze. Lightly mist the joints with water if using polymeric sand and let everything dry before sealing.
Step 3: Mask and Protect Adjacent Surfaces
Use painter’s tape and drop cloths to protect walls, siding, lawn edges, and any surfaces you don’t want sealer on. This is especially important when spraying — overspray travels farther than you expect. Cover nearby plants, since some solvent-based sealers can damage foliage, and move vehicles off a driveway before you begin.
Step 4: Apply the Sealer
Choose Your Application Method
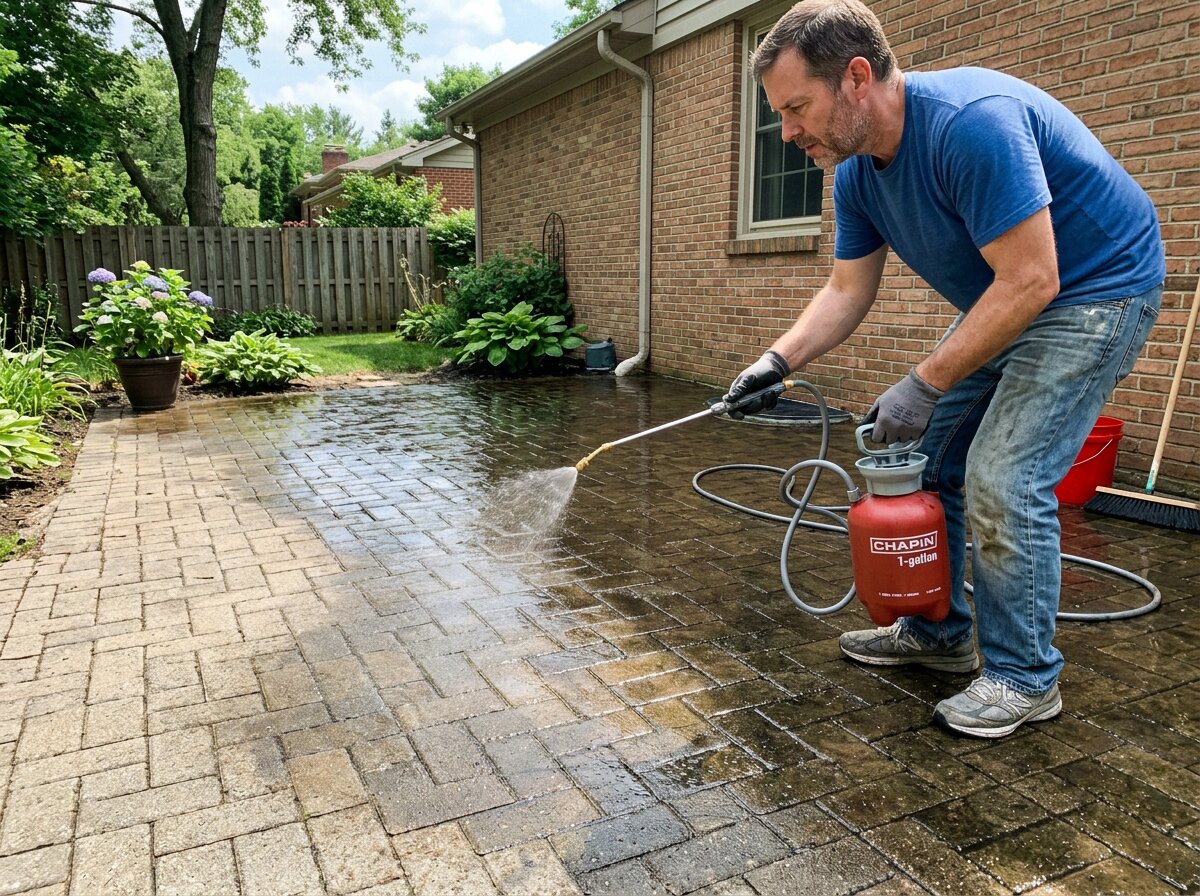
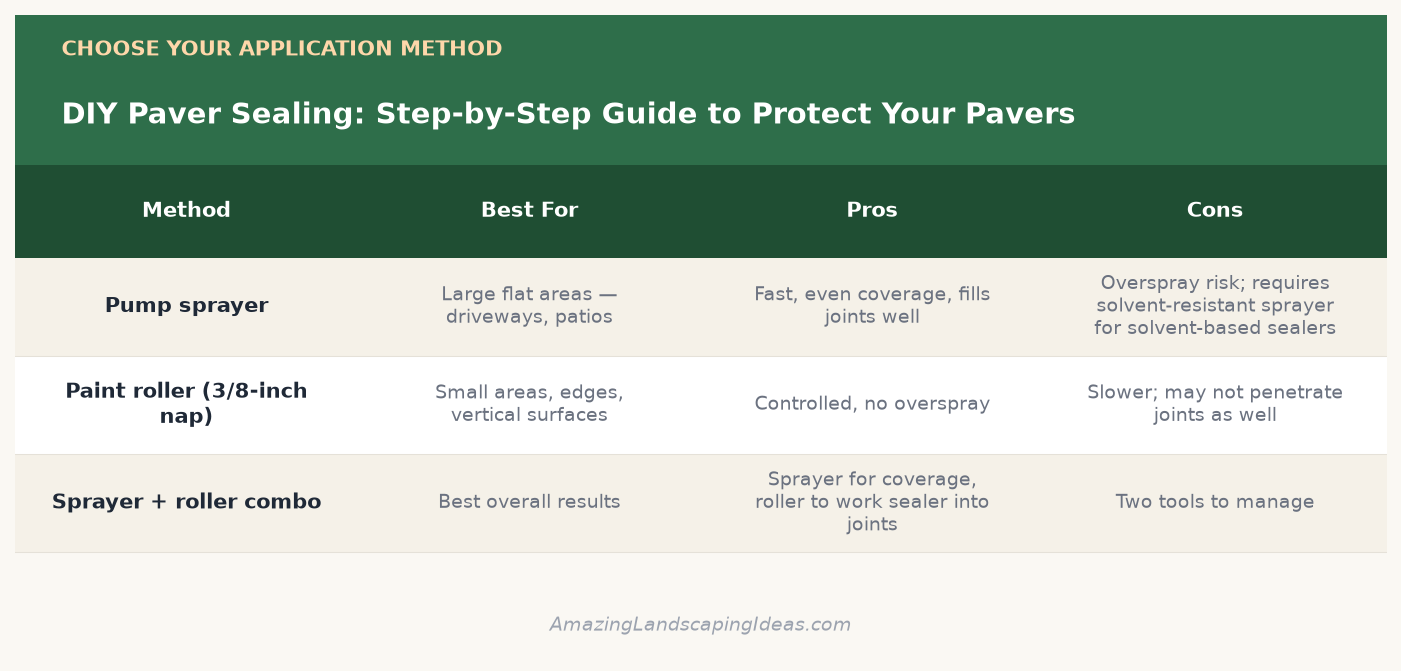
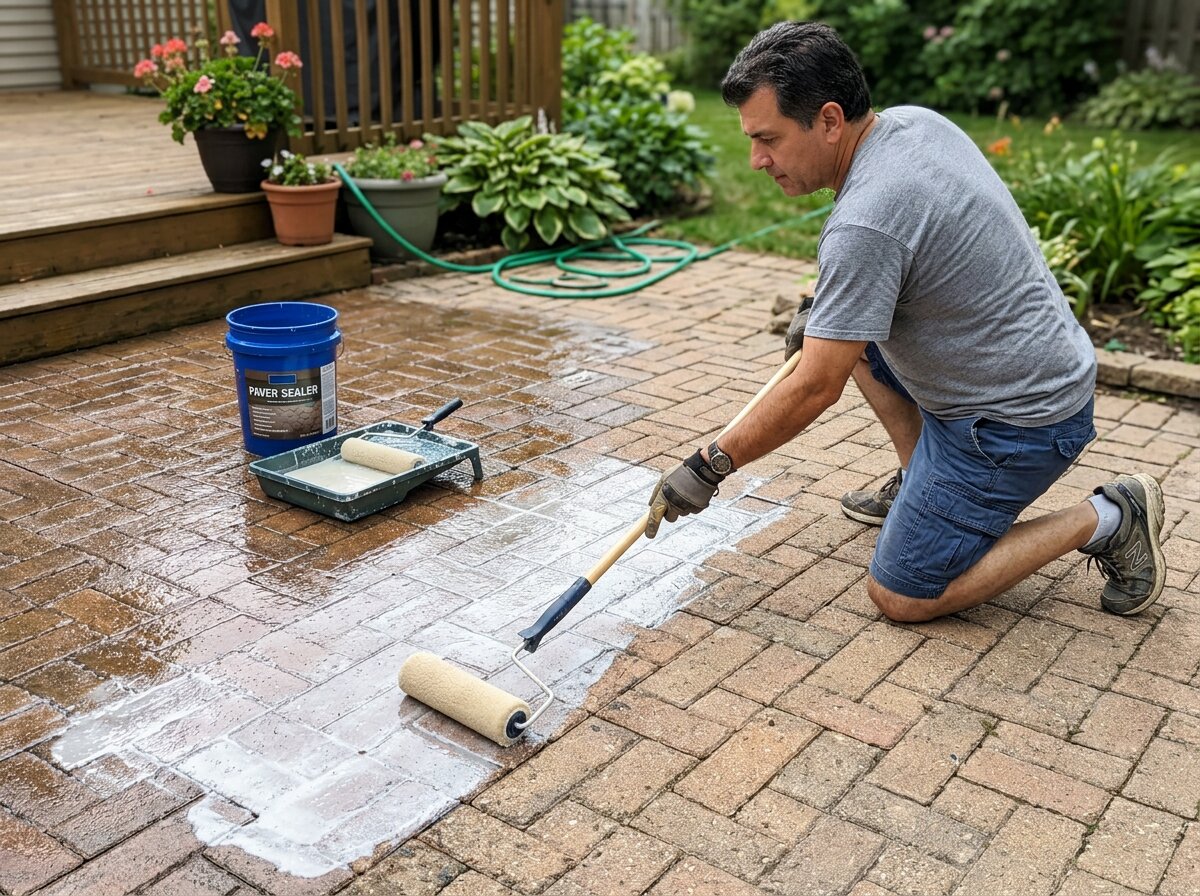
A pump sprayer gives fast, even coverage on large flat areas and works sealer into the joints, while a roller offers controlled application on small areas and edges. Many DIYers use a sprayer for the field and a roller for the perimeter. The infographic below compares the options.
How to Apply
- Read the label — Follow the coverage rate (typically 100–200 sq. ft. per gallon on pavers), drying times, and recommended number of coats.
- Start at the far corner — Work toward your exit so you never step on freshly sealed pavers.
- Apply thin, even coats — Don’t flood the surface. Pooling causes cloudy, uneven curing and a sticky film. Maintain a wet edge to avoid lap marks.
- Work the sealer into the joints — The first coat should saturate and bind the joint sand; a back-roll helps push it in.
- Apply a second coat — Once the first coat is tacky-dry, apply a second thin coat for full color and protection.
Step 5: Drying and Curing
After application, the sealer needs time to dry to the touch and then cure to full hardness — two different milestones:
- Dry time — When the surface is no longer tacky, usually 2–6 hours. Keep foot traffic off until then.
- Cure time — When the sealer reaches full strength and the joint sand is fully hardened, typically 24–48 hours. Wait this long before replacing furniture or driving on a sealed driveway.
Avoid all water contact during curing. Rain on a freshly sealed paver surface causes clouding, whitening, and a blotchy finish. Check the forecast and plan for at least 24–48 hours of dry weather after application. Apply when surface temperatures are between 50°F and 90°F and out of direct, intense midday sun.
Step 6: Maintain Your Sealed Pavers
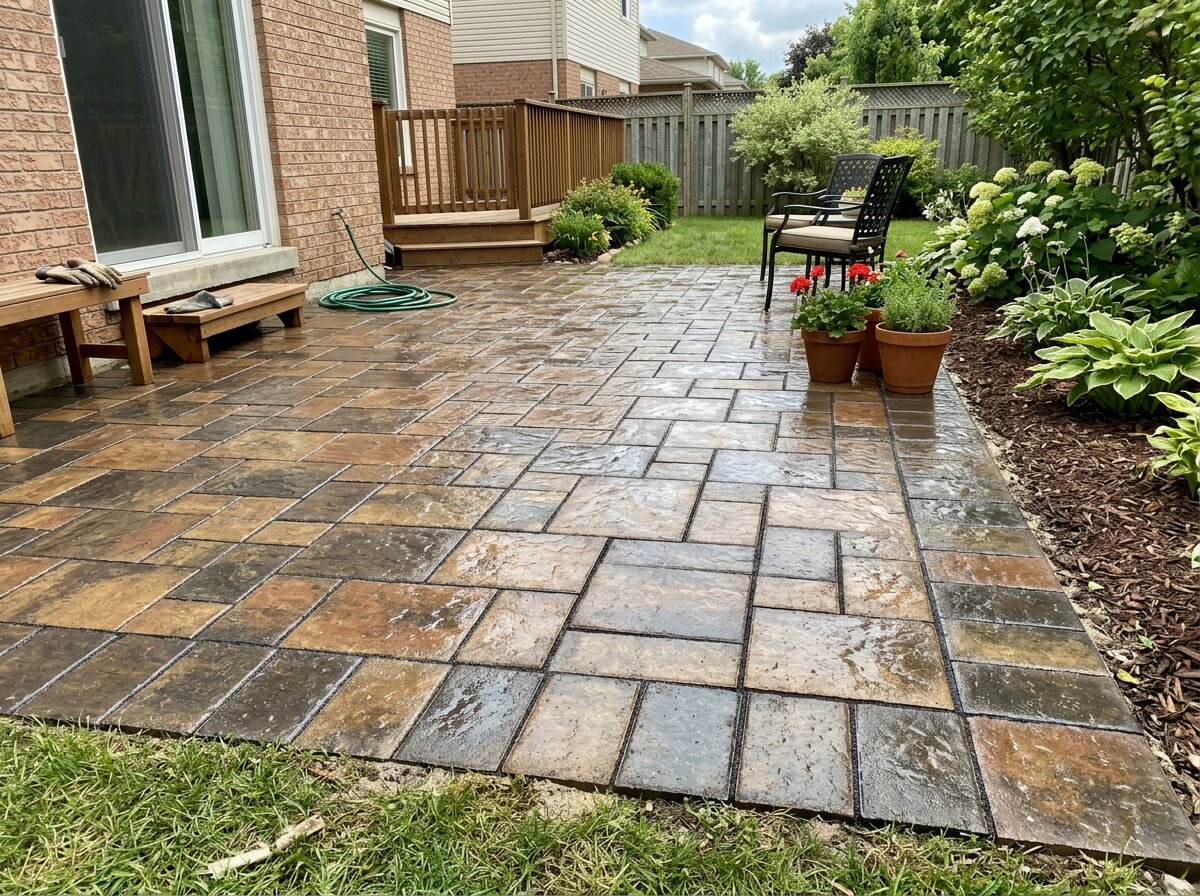
A sealed paver surface needs far less maintenance than an unsealed one, but it’s not maintenance-free. Sweep regularly and rinse off debris, spot-clean spills promptly, and avoid harsh de-icing chemicals in winter. Reapply the sealer every 2–5 years depending on traffic, climate, and the product used. A simple test: sprinkle a few drops of water on the pavers — if it beads up, the sealer is still working; if it soaks in and darkens the paver, it’s time to reseal.
When to Call a Pro
DIY paver sealing is very achievable, but consider hiring a professional when:
- The area is very large — Big driveways and multi-zone patios become a serious time and material commitment.
- The pavers have failed sealer or heavy efflorescence — Stripping old, peeling sealer is messy and labor-intensive; pros have the right strippers and equipment.
- The installation has settled or shifted — If pavers are sunken, heaving, or the base is failing, that must be repaired before sealing.
- You want a flawless high-gloss wet-look — Gloss finishes show every streak and roller mark, and pros can deliver an even, professional result.
Not feeling confident? Local partners can complete this job quickly and professionally. Find a Local Pro.
Conclusion
Sealing your pavers is one of the simplest, most rewarding DIY projects for any hardscape. By choosing the right sealer — water-based or solvent-based, wet-look or natural-matte — refilling the joint sand, and prepping the surface properly, you’ll lock the joints in place, block stains, preserve color, and keep weeds and ants out for years. Remember: 80% of a great result comes from surface prep and thin, even application. Clean thoroughly, fill the joints, apply on a dry day within the right temperature range, and reseal on schedule. Your patio, walkway, or driveway will reward you with a rich, protected, like-new finish season after season.
Leave a Reply